
Have you ever had to setup DNS over TLS for your Domain Nameserver?
As a Developer who normally doesn’t put too much thought into infrastructure related topics, that can be a daunting task.
This post introduces a new CoreDNS Plugin that allows for fully automatic TLS certificates in CoreDNS. No more worrying about expiring certificates and no need to setup external programms such as certbot. CoreDNS can handle it all for you.
The essential requirement is that CoreDNS needs to be authoritative for an existing Domain so that it can obtain a valid certificate for that particular domain.
There is currently an open PR to integrate this plugin into CoreDNS, if and when these changes get merged I will update this post with new instructions, until then the plugin can already be used as an external plugin with a bit more upfront setup work.
TLDR: https://github.com/mariuskimmina/coredns-tlsplus
Table of Contents #
- Managing Certificates before ACME
- Introduction of ACME
- Integration of ACME into Caddy
- ACME for DNS Server
- Who should use this plugin and when?
- How it works
- Requirements
- Setup
- Example
- Challenges
- Future Work
- Final Words
- References
Managing Certificates before ACME #
Back in the days, before Let’s Encrypt was a thing, obtaining and renewing TLS certificates required a lot of work. To be more percise, one had to go to all of these steps to successfully manage TLS certificates
- Generate Private Key
- Generate CSR
- Secure Key
- Order SSL certificate
- Paste CSR into online form
- Choose an email address
- Wait for email
- Click link in email
- Wait for another email
- Download certificate
- Concat into bundle
- Upload to server
- Configure server
- Reload configuration
- Don’t forget to renew it
(Luckily, I never had to go through this myself, thus I have taken this list from someone who did)
In those days, most CAs also charged money for signing certificates. As a result, many people didn’t bother providing valid certificates for their personal websites or blogs (let alone DNS servers). Most people probably would have liked to setup proper HTTPS for their site at the time but the effort to get in touch with a CA and also having to pay for it was just not worth it to most people.
Charging money for this kind of service made sense since the CA had to put in some effort to actually verify that you own a domain before you can get a certificate for it. To bring the encryption of the web forward a better approach had to be invented that eliminated the need for manual ownership verification.
Introduction of ACME #
When Let’s Encrypt came around, things changed drastically.
![]()
They simplified obtaining a signed certificate for your domain into the following steps
- Install certbot
- Run a certbot command (
sudo certbot certonly --standalone) - Configure your application
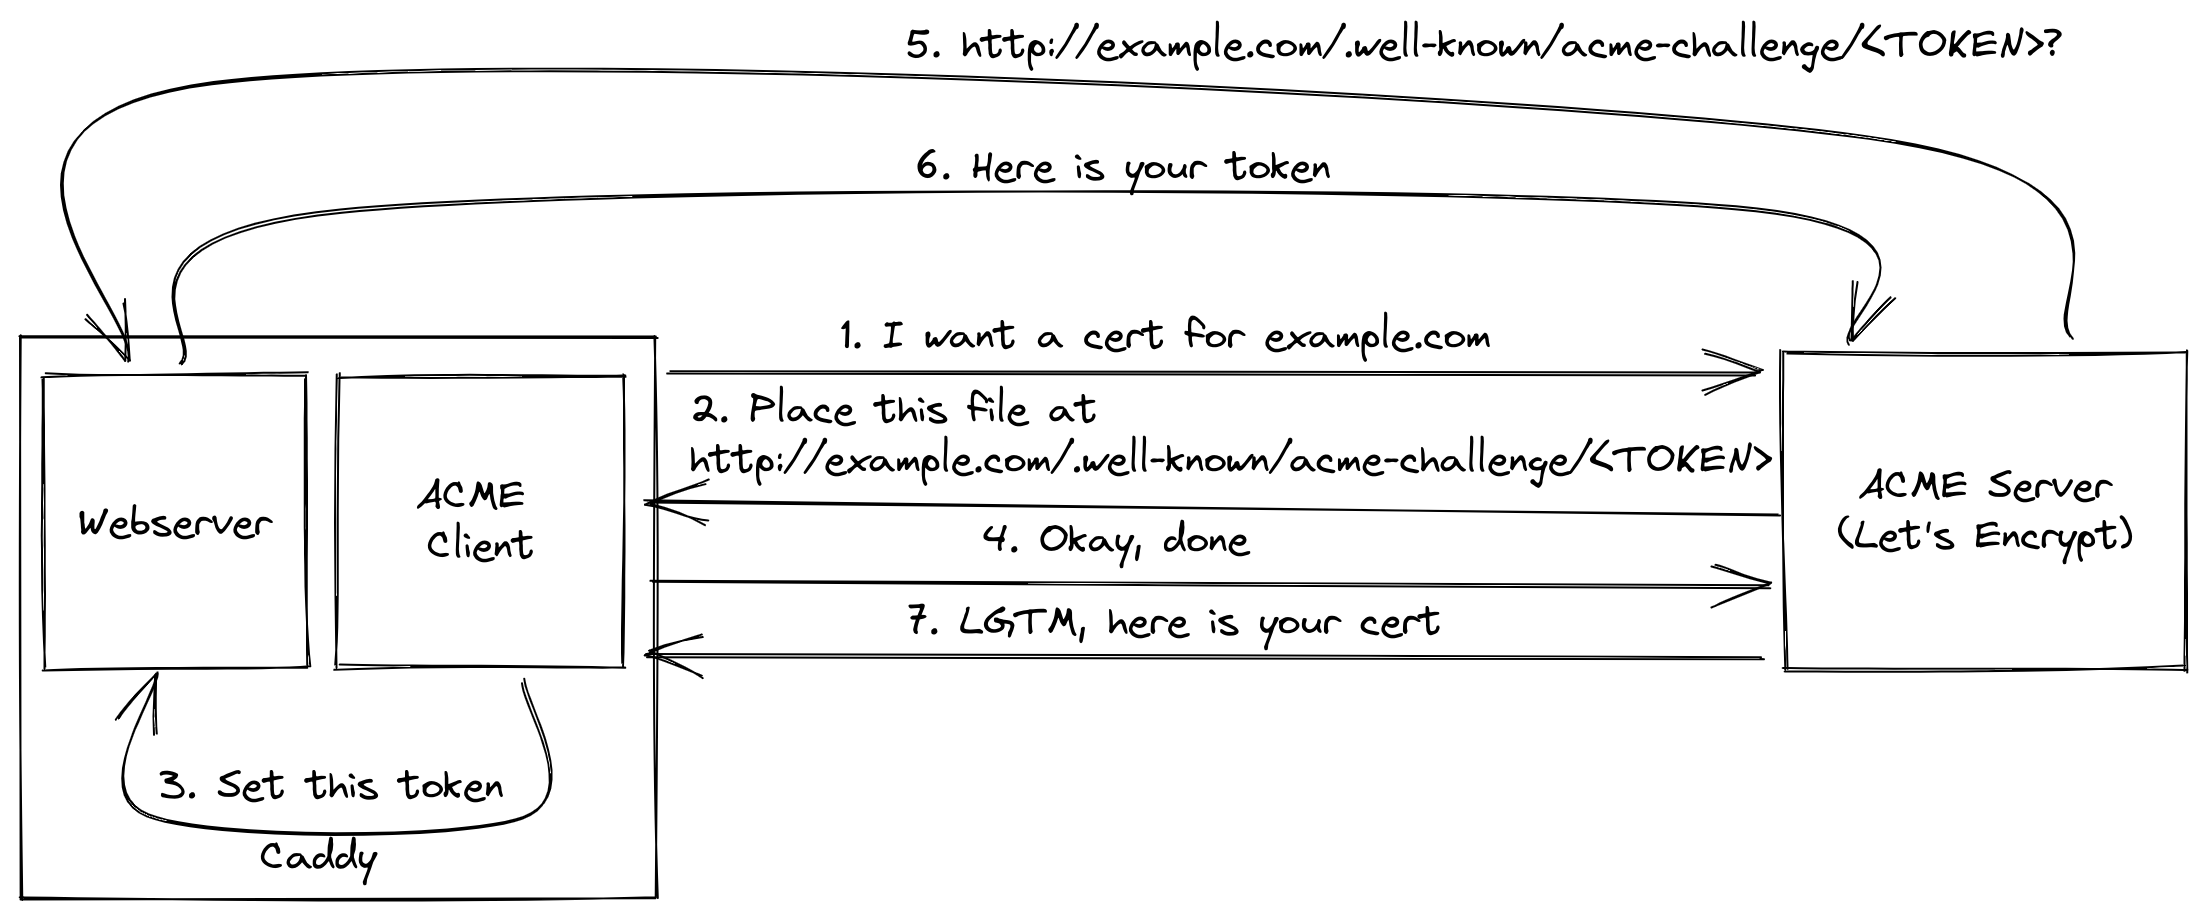
To achieve this, they created a client server protocol called ACME. This protocol allows them to verify the ownership of a domain fully automatically. While old Certificate Authoritys had to manually ensure that the their client’s actaully own a domain before issueing a certificate, Let’s Encrypt was able to do this any time of the day and almost instantly. So, not only could they offer a service for free where others have been charging money for years, they were also much faster in issueing certificates than any traditional CA.
To validate the domain ownership, you have to solve a challenge. The ACME server will provide you with a token that you can you can place either
on the webserver, that’s running on your domain or on the authoritative DNS server of your domain.
These challenges are called:
- HTTP-01
- DNS-01
Solving either one of these will enable you to obtain a certificate for your domain but only the DNS challenge will allow you to obtain wildcard certificates.
According to their own stats there are close 300M Domains that use certificates issued by Let’s Encrypt.
The use of HTTPS has increased rappidly ever since their launch. They took the human out of the loop by building
a certificate authority that could validate your domain ownership fully automatically. They created a client-server
protocol called ACME, which has become an open standard.
Let’s Encrypt (or other CAs) provide an ACME server with which any client (e.g. certbot) can use to obtain a certificate.
Integration of ACME into Caddy #
In 2015 the Webserver Caddy introduced HTTPS by default.
To achieve this, caddy itself acts as an ACME client, removing the need of a programm like certbot to be installed.
While certbot already made things easy, there was still some room for error.
The steps for obtaining and using a TLS certificate with caddy are as follows:
- Configure your application
No need to install any other applications you just have to setup caddy to serve on the domain that you want a certificate for
and it will obtain (and renew) it’s certificate. This also made the entire process even more reliable, since it eliminiated
the need for certbot and the server to work together.
Caddy was the first application ever to manage it’s own certificates and has further revolutionized the use of encryption on the web.
Also, the librarys that enables automatic HTTPS in Caddy is called certmagic and is open-source, meaning that you have no excuse not to provide HTTPS out of the box on your next web application written in Go.
ACME for DNS Server #
Now, the idea was that this idea that originated in caddy could also be applied to DNS servers.
As you saw earlier, there are two types of challenges involved in ACME. Caddy is using the HTTP-01 challenge to obtain it’s own certificate. So what about a DNS server that uses the DNS-01 challenge?
Especially when the DNS server is actually itself the authoritative DNS server for a domain, then it should be possible for this server to obtain a certificate for this domain. That’s excatly what I did and the DNS server I did it for is CoreDNS.
![]()
CoreDNS has a plugin architecture, which means that the server by itself provides only a bare minimum of functionaliy.
The user then adds plugins to make CoreDNS fit his use case. I have adjusted the tls plugin so that it can act as an
ACME client and requests certificates from Let’s Encrypt (or other CAs).

Certificates that are obtained this way will also automatically be renewed once more than 70% of their validity period have passed, just like certbot would do. There is a significan’t advantage here tho, since CoreDNS has to be restarted to work with new certificates, using a new certificate from certbot still required a manual restart of CoreDNS. This new tls plugin is performing this restart for you and allows administrators to completly forget about managing certificates for CoreDNS.
Who should use this plugin and when? #
First of all, using this plugin makes it really easy to setup DNS over TLS or DNS over HTTPS. If you are a Developer who wants to setup a DNS server with encryption, you can do this easily. You shouldn’t need to be a SRE or any other kind of infrastructure expert to set this up.
As to when you want to use this pluign, there are 2 cases in which this plugin might help you tremendously.
- You want to setup an autoritative DNS server for your Domain and support DNS over TLS or DNS over HTTPS
- You work in a very restricted network and you need an encrypted DNS forwarder on a non-standard port
Authoritative DNS #
Since CoreDNS has to be the authoritative DNS Server for a domain to make this plugin work, the most obvious use case is to serve DNS over TLS or DNS over HTTPS for this particular domain.
If you are the owner of example.com and you want to setup your own nameservers at ns1.example.com and ns2.example.com for example (more about setting up multiple DNS Servers later) and you want to offer DNS over TLS or DNS over HTTPS then this plugin is for you!
Forwarding #
For this to work, the CoreDNS server still needs to be setup to be the authoriative DNS server for a domain.
(using a subdomain is totally fine as well)
Instead of only answering queries about this particular domain we instead forward all DoT querys to an upstream DNS Resolver such Google’s 8.8.8.8 or Cloudflare’s 1.1.1.1 Servers.
This can be extremly useful if you want to hide your DNS traffic in very restrictive Environments. You can setup up such a forwarder on a custom port, such as 8853 instead of the usual 853 because in a restrictive environments that port may be blocked.
Utilizing this plugin, you setup such a server once and then forget about it since the certificate will always be renewed automatically.
How it works #
This plugin utilizes the ACME protocol to obtain certificates from a CA such as Let’s Encrypt
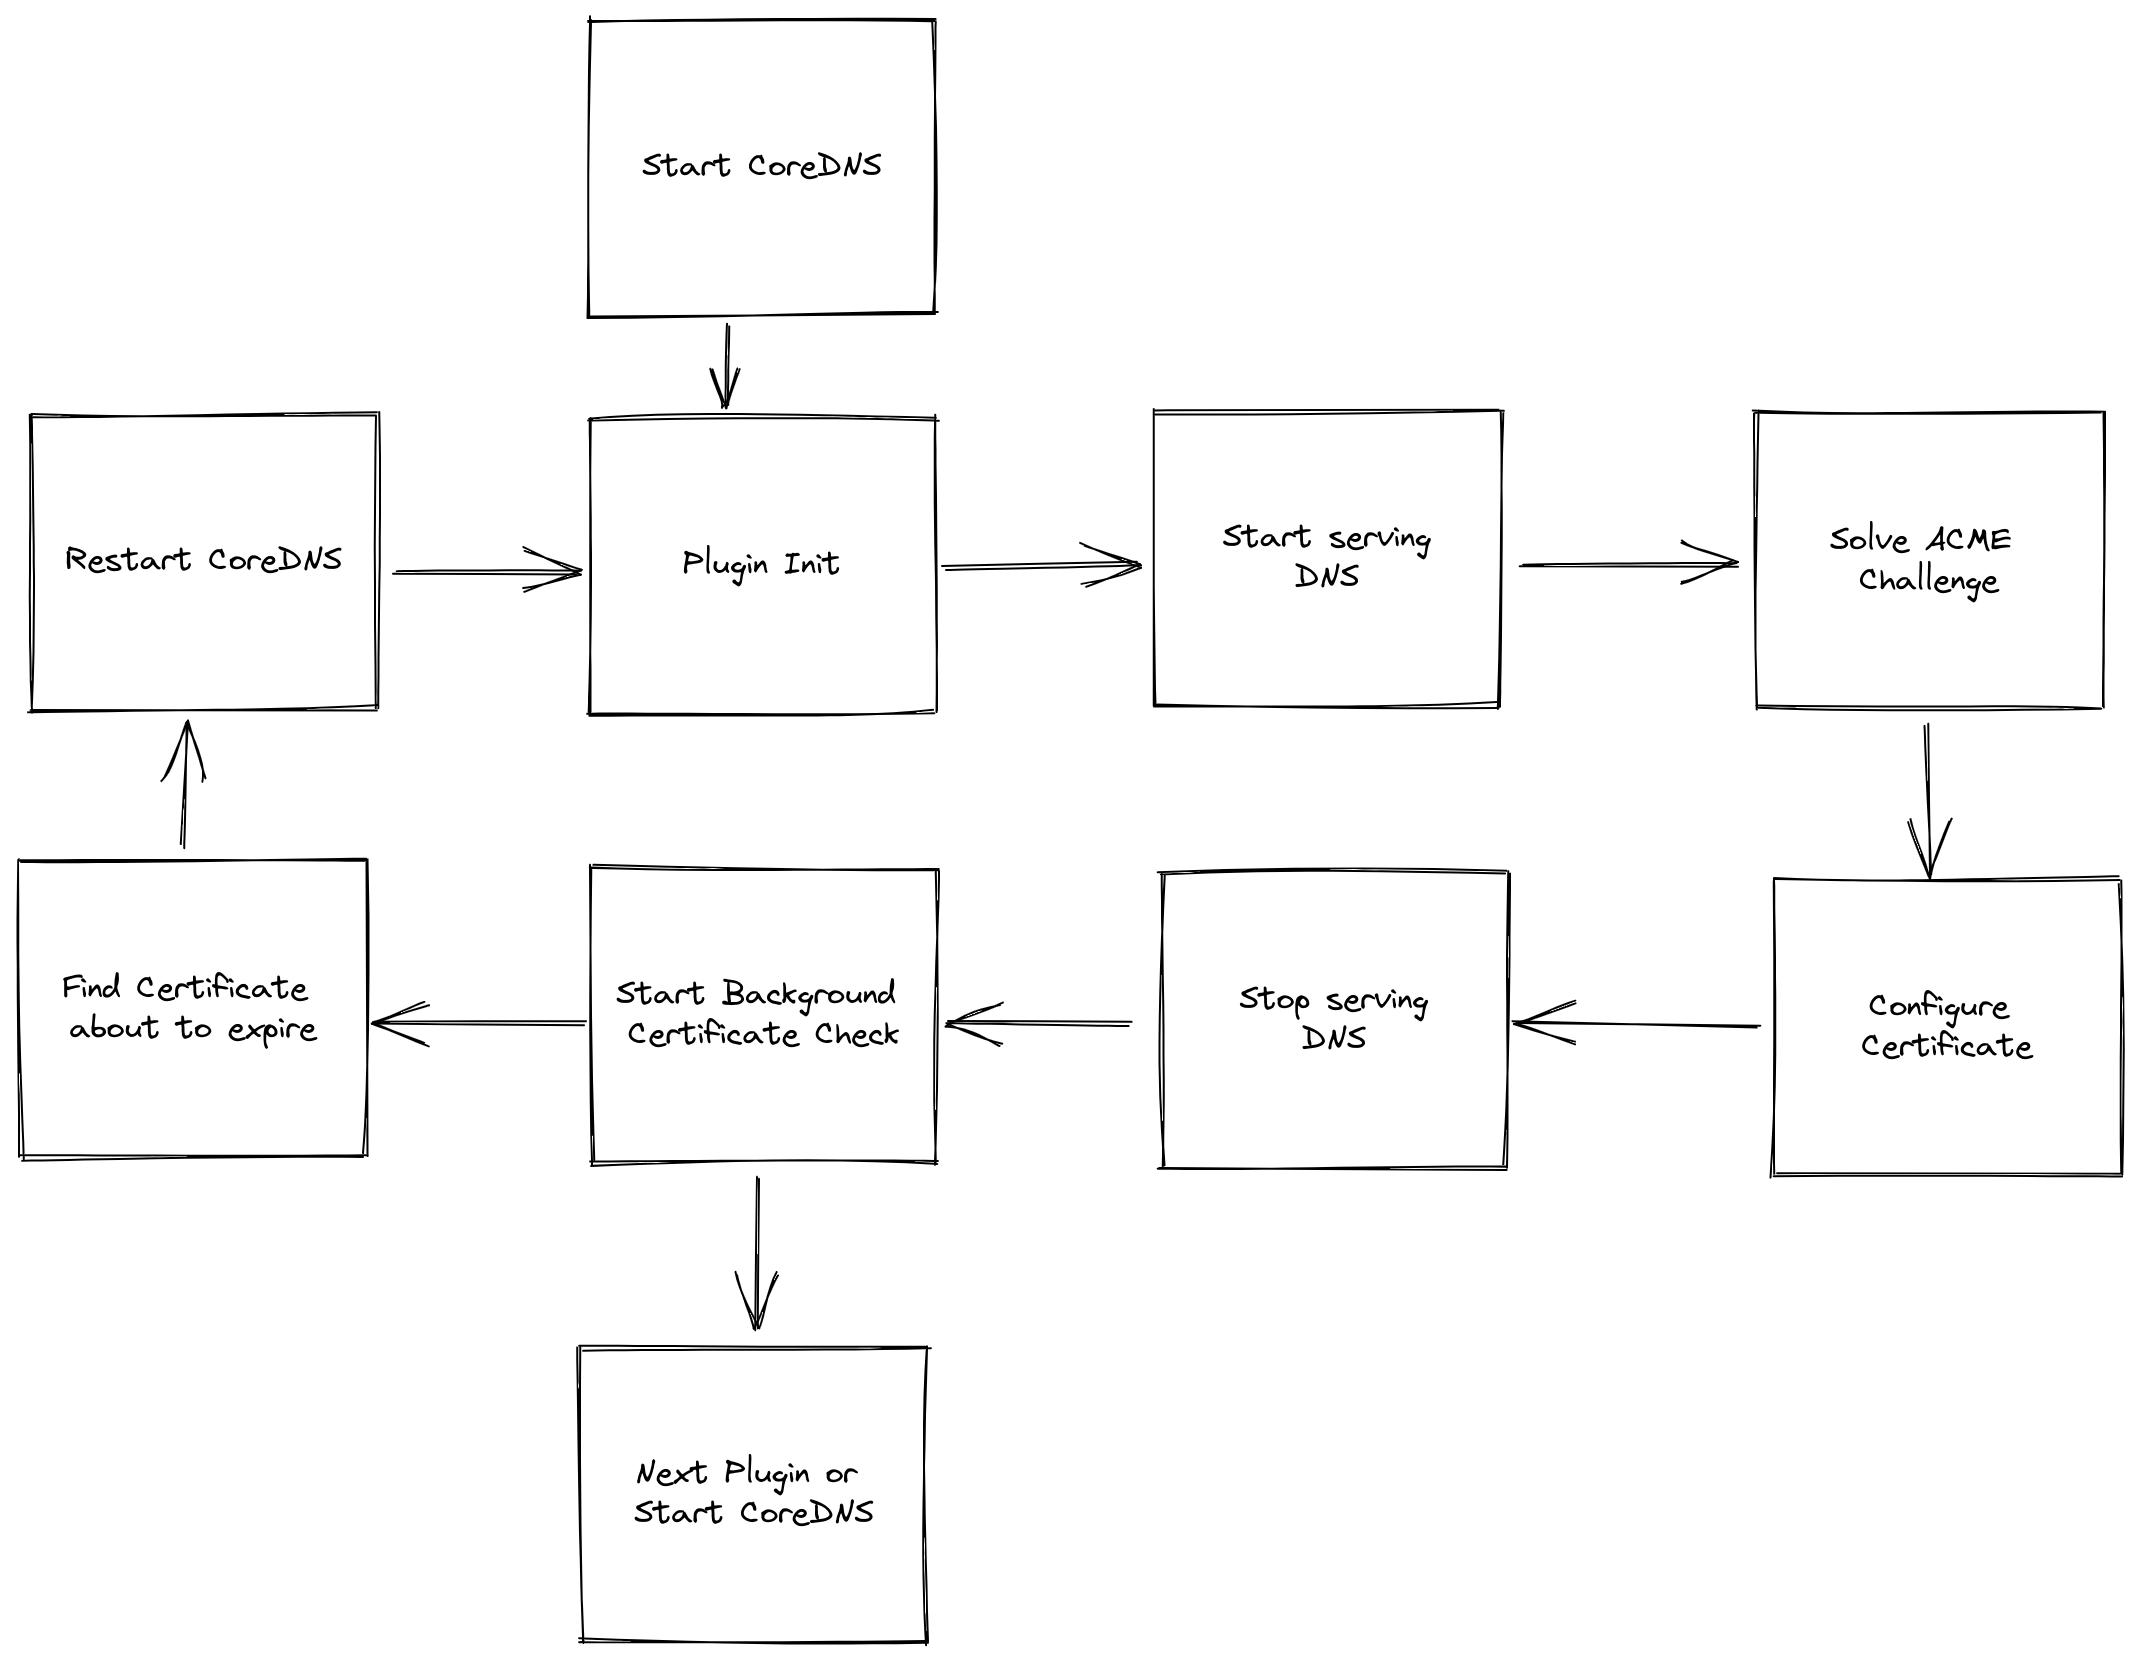
On startup the plugin first checks if it already has a valid certificate, if it does there is nothing to do and the CoreDNS server will start. If it doesn’t (or if the certificate will expire soon) then it will initialize the ACME DNS Challenge and ask Let’s Encrypt (assuming you didn’t configure another CA) for a Certificate for the domain you configured (assume it’s ns1.example.com).
The plugin will also start to serve DNS requests on port 53. Let’s Encrypt receives our request and sends out DNS requests for _acme-challenge.example.com. Since CoreDNS is supposed to be setup as the autoritative DNS server for example.com, these requests will reach us. The Plugin can answer those requests and in return receiv a valid certificate for ns1.example.com. Notice that the usage of Port 53 is mandatory for this to work, Let’s Encrypt won’t use any other port for challenge.
Furthermore, the plugin then starts a loop that runs in the background and checks if the certificate is about to expire. If it is, CoreDNS will initialize a restart which in turn leads to the plugin setup being executed again, which leads to a new certificate being obtained.
Requirements #
In order for this plugin to work you need the following:
- Own a domain
- Setup CoreDNS on a publicly reachable IP
- Setup CoreDNS as the authoritative DNS server for that domain
- Port 53 - While CoreDNS may serve DNS over TLS on any port, during startup the plugin will use port 53 to solve the ACME Challenge
To learn more about how to setup an authoritative DNS server, take a look at this article from Hugo Peixoto or this article that also uses CoreDNS. Also, if you need a general refresher on how DNS works, here is my favourite ressource
Setup #
The goal is to have this plugin integrated into the main CoreDNS repository, once that happens there wont be any setup requirements. Until then, the plugin exists as an external Plugin, which means you will have to go through some extra steps to compile CoreDNS with the Plugin integrated, which are described here:
# Clone CoreDNS
git clone https://github.com/coredns/coredns
cd coredns

# replace the original tls plugin with this tlsplus plugin
sed -i 's/tls:tls/tls:github.com\/mariuskimina\/coredns-tlsplus/g' plugin.cfg

# Get the module
go get github.com/mariuskimmina/coredns-tlsplus

# Tidy modules
go mod tidy

# Compile
go build
Authoritative Corefile #
The following is a straightforward example configuration for a CoreDNS server that is setup as the authoritative DNS Server for mydomain.com.
this example assumes that there are two host under mydomain.com one is a website, reachable at mydomain.com directly. The other one is
a CoreDNS server that’s running at ns1.mydomain.com.
With this configuration, the DNS server answer queries over both UDP and DoT. On first start-up the server will obtain a certificate for n1.mydomain.com. This certificate will automatically be renewed once more than 70% of it’s validity period have passed.
tls://example.com {
    tls acme {
        domain ns1.example.com
    }
    hosts {
        xxx.xxx.xxx.xxx example.com
        xxx.xxx.xxx.xxx ns1.example.com
    }
}

example.com {
    hosts {
        xxx.xxx.xxx.xxx example.com
        xxx.xxx.xxx.xxx ns1.example.com
    }
}
Forwarding Corefile #
This Corefile forwards all DNS over TLS requests to 9.9.9.9, the DNS Server of quad9.
Notice that this DNS Server listens on a custom port, 8853, while the standard port for DoT is 853. Being able to setup such a forwarding server can be useful in restrictive environments where the port 853 may be blocked to prevent people from encrypting their DNS traffic.
With the use of this new plugin, you can setup such a server and completly forget about it since the plugin will handle all certificate renewals for you.
tls://.:8853 {
    tls acme {
        domain ns1.example.com
    }
    forward . tls://9.9.9.9 {
        tls_servername dns.quad9.net
    }
}

example.com {
    hosts {
        xxx.xxx.xxx.xxx example.com
        xxx.xxx.xxx.xxx ns1.example.com
    }
}
Setting up multiple DNS Server #
For the most part, dns server should be setup with some redundancy. If you want to use this plugin with multiple CoreDNS Server, they all need to be able to access
the same Certificate. This can be achivied using a shared filesystem, like NFS, and pointing the certpath of all your CoreDNS Server to a location on this shared
fileystem.
I have tested such a cluster setup by running two CoreDNS instances on different Servers from DigitalOcean, following this guide made setting up NFS between them easy and worked right away.
tls acme {
    domain ns1.example.com
    certpath /some/path/on/nfs/certs/
}
Example #
In this section I want to walk you through setting up an encrypted dns forwarder. I will be using my own domain mariuskimmina.com as an example here.
The CoreDNS Server needs to be publicly reachable so for this example I will be using a Digitalocean Linux Server with the IP 206.81.17.195. I choose the cheapest one available as this setup will only exist for demonstration purposes.
On this Server I have setup a user marius with sudoer permissions. I have build a CoreDNS Server with the tlsplus plugin (as showcased earlier in this article) and copied it over to the Server using scp. I have also created the following Corefile:
tls://.:8853 {
    tls acme {
        domain dns.mariuskimmina.com
        ca https://acme-staging-v02.api.letsencrypt.org/directory
    }
    forward . tls://9.9.9.9 {
        tls_servername dns.quad9.net
    }
}

dns.mariuskimmina.com {
    hosts {
        206.81.17.195 dns.example.com
    }
}
By default systemd-resolver is running on port 53 on this ubuntu server. Since port 53 is a hard requirement for this plugin to work, we need to take down this resolver.
sudo systemctl disable systemd-resolved
sudo systemctl stop systemd-resolved
With that done, the ubuntu server now is unable to resolve any hostname. Which is also a problem as the plugin needs to resolve the domain name of Let’s Encrypt to initialize the ACME challenge. to work around this we can set a different nameserver in /etc/resolv.conf.
$ cat /etc/resolv.conf
nameserver 1.1.1.1
options edns0 trust-ad
search .
Now we are almost ready to obtain a Certificate for dns.mariuskimmina.com and serve DNS over TLS but there is one more thing.
We need to setup dns.mariuskimmina.com at our dns registar of choice, which for me is domains.google.com. In more concret terms, this means we need to setup an A record for dns.mariuskimmina.com that points at 206.81.17.195 and an NS record for dns.mariuskimmina.com that points at dns.mariuskimmina.com
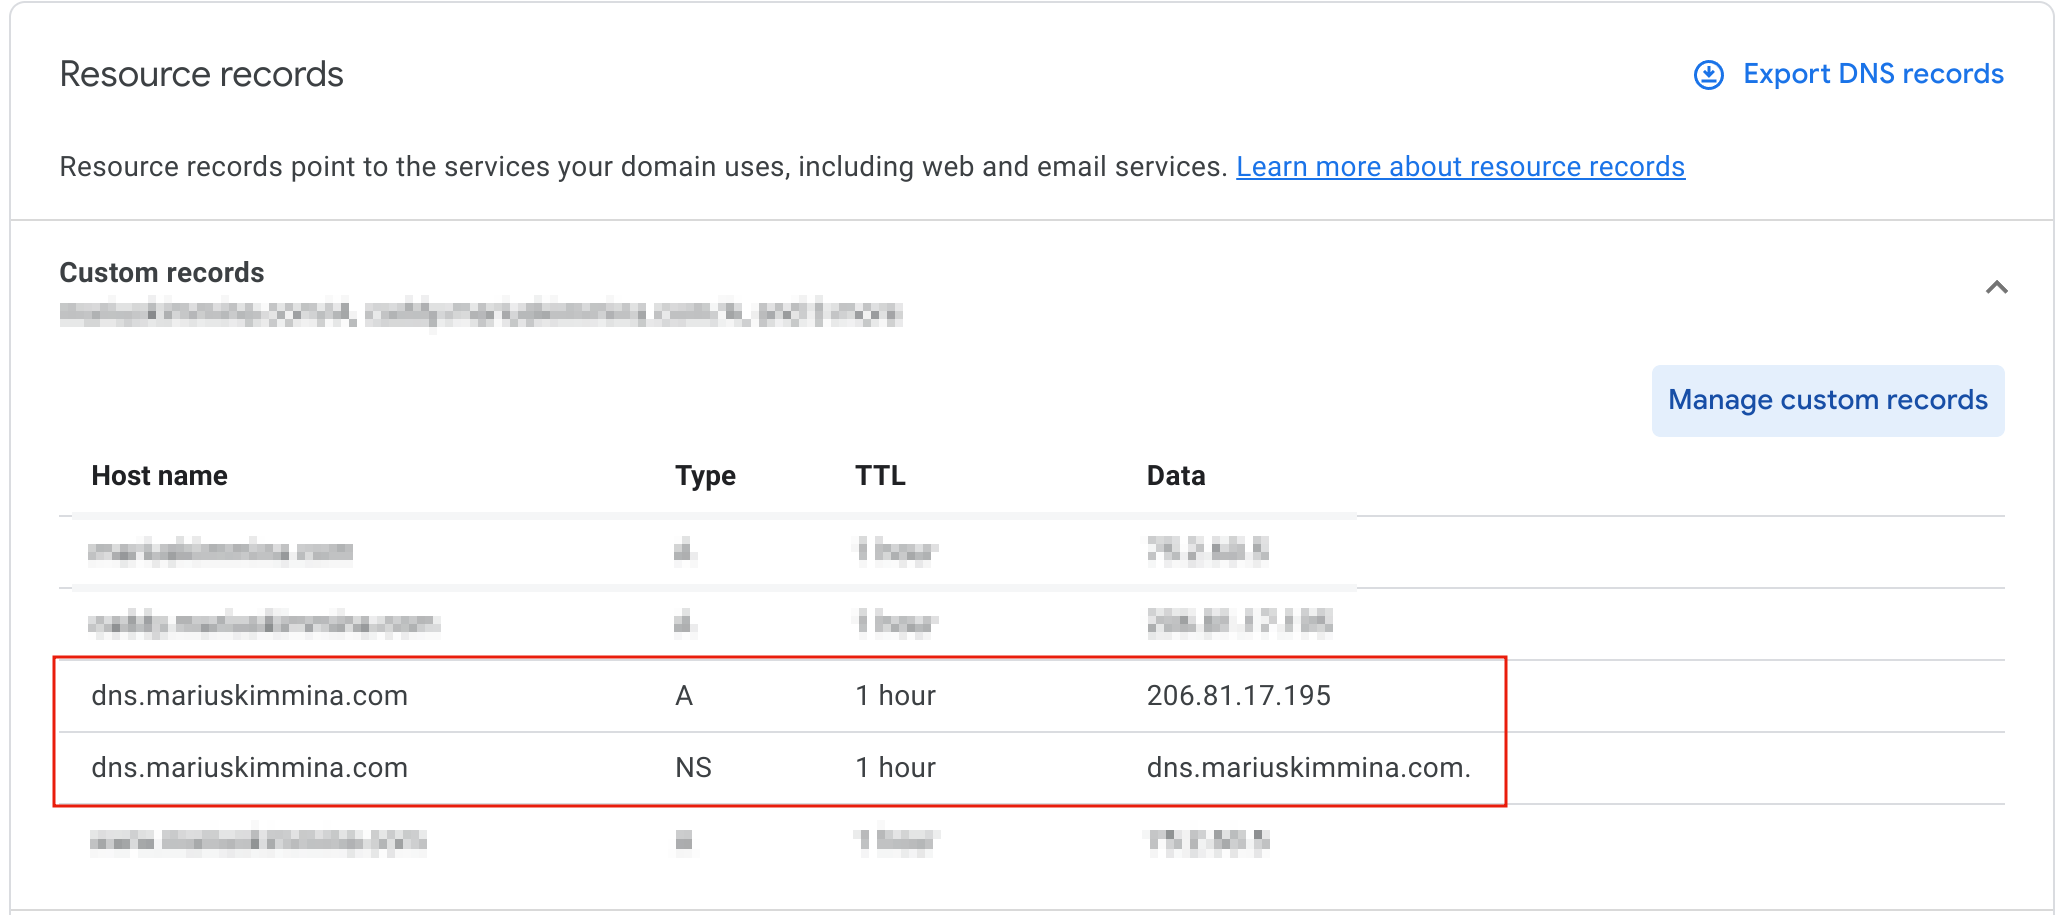
Once that has been put in place, we can run coredns and a certificate signed by Let’s Encrypt should automatically be obtained.
$ sudo ./coredns
[INFO] plugin/tls: Obtaining TLS Certificate, may take a moment
[INFO] plugin/tls: Answering ACME DNS request:_acme-challenge.dns.mariuskimmina.com.
[INFO] plugin/tls: Answering ACME DNS request:_acme-challenge.dns.mariuskimmina.com.
[INFO] plugin/tls: Answering ACME DNS request:_acme-challenge.dns.mariuskimmina.com.
[INFO] plugin/tls: Answering ACME DNS request:_acme-challenge.dns.mariuskimmina.com.
tls://.:8853
dns.mariuskimmina.com.:53
CoreDNS-1.9.4
linux/amd64, go1.18.1
In case you are wondering why we have to answer _acme-challenge.dns.mariuskimmina.com 4 times here, this is a security mechanism that has been put in place by Let’s Encrypt. You can learn more about it here.
Keep in mind that I used the staging CA of Let’s Encrypt in this example, so for production use you would want to replace that. It can be helpful to test with staging first tho - Let’s Encrypt has strict rate limiting in place and if you mess up on the configuration of the registar for example you easily be blocked from future attempts for a while.
To verify that the Server works, we can send DNS over TLS requests with kdig
kdig -d @dns.mariuskimmina.com:8853 google.com +tls
;; DEBUG: Querying for owner(google.com.), class(1), type(1), server(dns.mariuskimmina.com), port(8853), protocol(TCP)
;; DEBUG: TLS, received certificate hierarchy:
;; DEBUG:  #1, CN=dns.mariuskimmina.com
;; DEBUG:      SHA-256 PIN: HwChNlJlYJlSNR442IfcBmtKY9LPdAM4LlOoxLBsmT8=
;; DEBUG:  #2, C=US,O=(STAGING) Let's Encrypt,CN=(STAGING) Ersatz Edamame E1
;; DEBUG:      SHA-256 PIN: dcVinEyA33P2/hInHEWokuWDlfpROVda+8XRDZW7hyI=
;; DEBUG:  #3, C=US,O=(STAGING) Internet Security Research Group,CN=(STAGING) Bogus Broccoli X2
;; DEBUG:      SHA-256 PIN: 5OfjqXLkPnXTVmxetcPj1PEbXH2upTZebfT2X3AE8Fw=
;; DEBUG: TLS, skipping certificate PIN check
;; DEBUG: TLS, skipping certificate verification
;; TLS session (TLS1.3)-(ECDHE-X25519)-(ECDSA-SECP256R1-SHA256)-(AES-128-GCM)
;; ->>HEADER<<- opcode: QUERY; status: NOERROR; id: 10537
;; Flags: qr rd ra; QUERY: 1; ANSWER: 1; AUTHORITY: 0; ADDITIONAL: 1

;; EDNS PSEUDOSECTION:
;; Version: 0; flags: ; UDP size: 4096 B; ext-rcode: NOERROR

;; QUESTION SECTION:
;; google.com.                  IN      A

;; ANSWER SECTION:
google.com.             287     IN      A       142.250.186.78

;; Received 65 B
;; Time 2022-11-05 11:03:35 CET
;; From 206.81.17.195@8853(TCP) in 86.0 ms
Keep in mind that this example setup uses the staging Let’s Encrypt CA (apparently called Bogus Broccoli X2). For production use set the ca parameter to https://acme-v02.api.letsencrypt.org/.
Challenges (not the ACME ones) #
Here I want to talk about obstacles I had to overcome and some things I could have done better during this project.
The first lesson that I had to learn is that a simple design is (almost) always better. When a certificate needs to be renewed, my first thought was that the CoreDNS itself should first solve the challenge and obtain a certificate, then a restart should happen.
The thing is, I already had this bootstrapped DNS server implemented to solve the challenge during the plugin setup. So I could just use this server, not just when CoreDNS is started for the first time, but everytime a certificate needs to be renewed.
Another lesson was about using existing open-source librarys. The current implementation is using certmaigc but that wasn’t my original intention. At first I thought It would be better to use a more minimal ACME library. I certainly had the best intentions but certmagic is already used in caddy (which we are trying to imitate here) and has been battle-tested many times.
There was also one thing I missed during my tests. CoreDNS needs to be able to resolve the Let’s Encrypt Domain during the ACME challenge. So we need to have a different system resolver (/etc/resolv.conf) configured for this plugin to work.
Also, I learned that I need to improve on working together via git and github. I created a fork of the project, did all my changes there. So in the end I send one giant 1.5K lines Pull Request to the CoreDNS Repo. Reviewing such a huge PR at once can be overwhelming and discouraging. A better approach would have been to open a draft PR early on and to send my updates there periodically. For smaller changes submitting all changes in one PR would have been fine but at the scale of over a thousand lines of code there should have either been multiple PRs and or I should have used a Draft PR.
Futute work #
There are more ways in which CoreDNS and the ACME protocol could be used for certificate management.
- CoreDNS could provide an API to let other ACME clients solve the AMCE challenge for other (web-)servers
- CoreDNS could use the API of another DNS provider to obtain a certificate for domain without having to be the autoritative DNS server itself
Caddy can also automatically perform local HTTPS by creating it’s own trusted certificate chain. This feature could also be implemented in CoreDNS in the future.
Final Words #
This Plugin was created as part of the 2022 Google Summer of Code.

As a student I had made some small contributions to open-source projects here and there but nothing that comes even close to the scale of this project. Participating in GSoC helped empower me to focus on a project all the way from start to finish, which is something not just me but a lot of people struggle with. If you always wanted to have an impact on open-source software but could not never commit yourself to a side project long enough, consider participating in next years Google Summer of Code
I want to thank my mentors Yong Tang and Paul Greenberg who guided me on this journey. Due to them I was not only able to make a major contribution to CoreDNS but they also taught me a lot about the economics of open-source technologies. The lessons I learned during these months will without a doubt be useful for many years to come.
References #
Articles and Docs #
https://zwischenzugs.com/2018/01/26/how-and-why-i-run-my-own-dns-servers/
https://www.cloudflare.com/learning/dns/dns-over-tls/
https://developers.google.com/speed/public-dns/docs/dns-over-tls
https://letsencrypt.org/docs/challenge-types/
https://www.joshmcguigan.com/blog/run-your-own-dns-servers/
https://opensource.com/article/17/4/build-your-own-name-server
https://educatedguesswork.org/posts/dns-security-adox/
https://www.gophp.io/run-your-own-nameservers-with-coredns/
https://hugopeixoto.net/articles/self-hosting-nameservers.html
Open Source Software used #
CoreDNS: https://github.com/coredns/coredns
Certmagic: https://github.com/caddyserver/certmagic
Pebble: https://github.com/letsencrypt/pebble